
Did you also know you can make your own protein shake kits? It’s not hard at all. And despite the length of this post and the number of accompanying pictures it doesn’t actually take that long, especially when only making a few days worth.
Now you might ask yourself why you might WANT to do this? Well…
- Is the only shake you like the special shake you make at home with your syrups?
- Do you find yourself wanting an indulgence during your work day?
- Do you ever find yourself in a pinch needing a quickie meal on the go?
If you answered yes to any of those questions, a shake kit can be a great solution! And I’m going to show you how with a little preparation and a lot of creativity you can take nearly ANY shake on the go with you.
Here are the supplies you’ll need
- A Food Saver machine or another kind of vacuum sealer, if you have one (these things are worth their weight in GOLD after surgery when you never seem to finish anything you cook!). If you don’t have one, you can certainly use snack sized baggies to just make dry packet shake kits.
- Food Saver bags (I used the rolls that are 11 in. x 16 ft.)
- A craft cutter (or a good pair of scissors, a ruler and a good deal of determination)
- The dry components of your favorite protein shake recipe (Need ideas? Here are a bunch of them!), which could include (but is in no way limited to):
- Protein powder (here’s the kind I use in the pictures below)
- Powdered nonfat milk
- Unsweetened cocoa powder
- Dry pudding mix
- Instant coffee, etc.
- A plastic container (I find the kind deli meat comes in works nicely)
- A clean piece of white paper and some tape
- Your favorite sugar-free syrup (here’s a good starter set if you’ve never tried them before), although you can certainly make shake kits without syrups (and I’ll tell you in a minute why you might want to consider that)
- A clip (A bobby pin works…I’ll explain in a minute!)
- Glue dots
- A marker or a label of some kind
Step One: Cutting your bags
Syrup bags
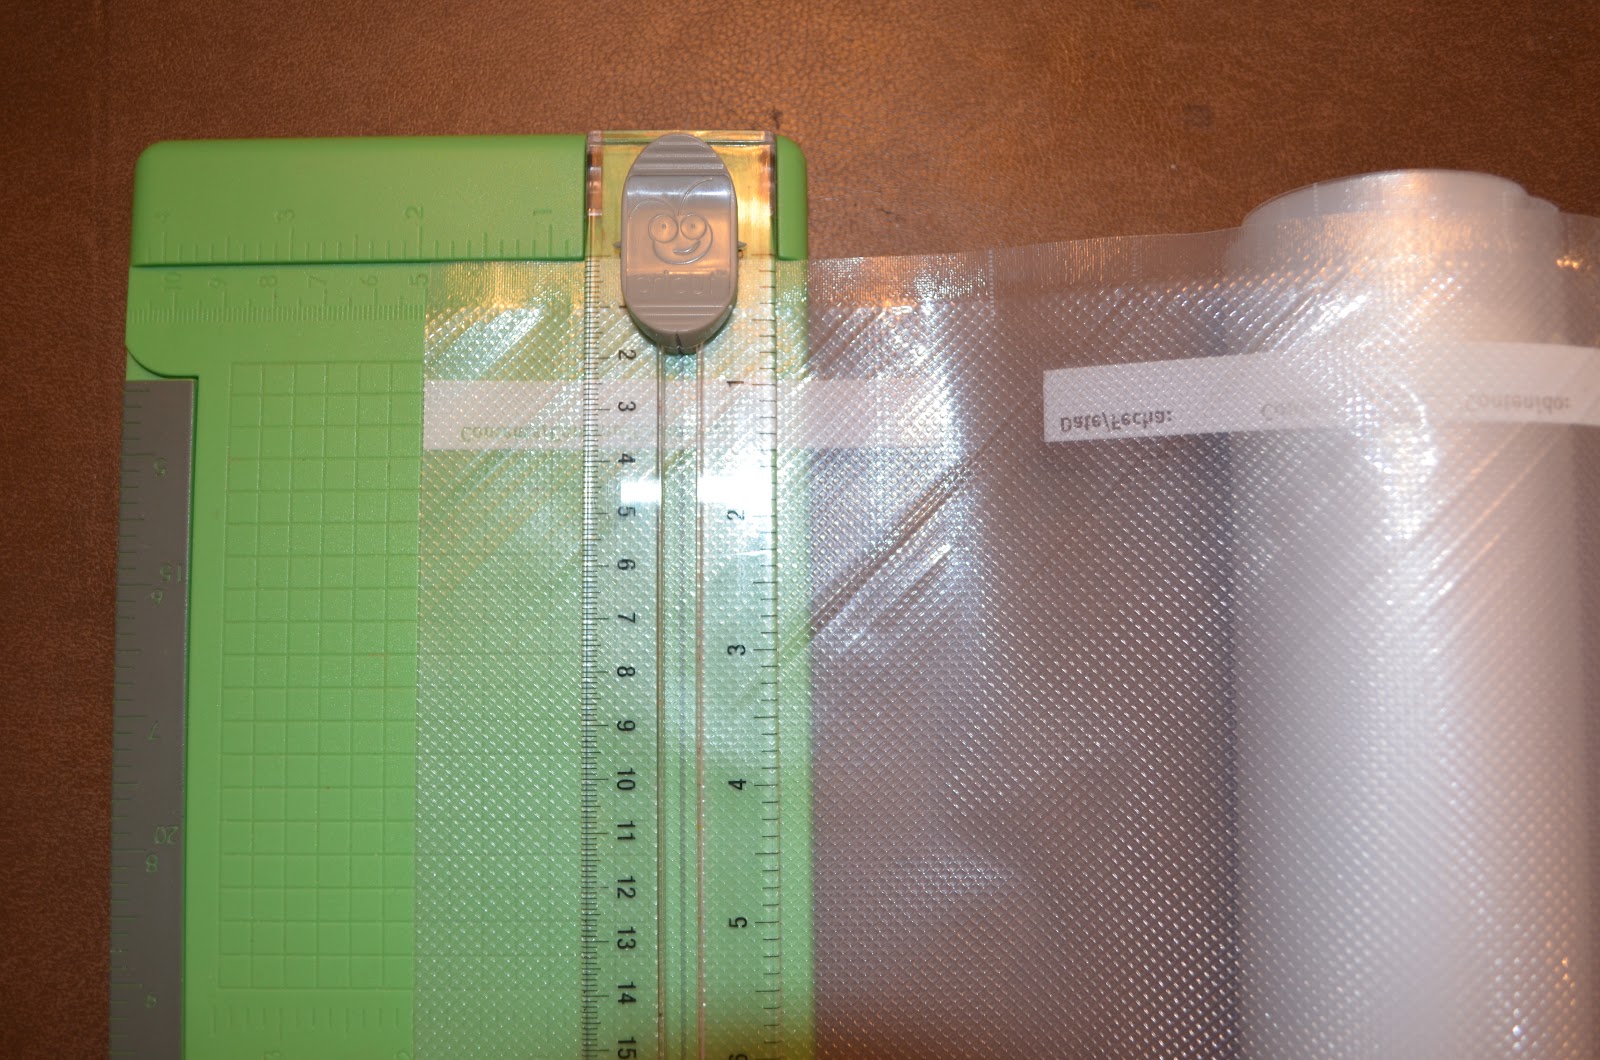
Lay your bag roll upright (so the 11 inches is going vertically) and cut out 2 inch strips. Each of these strips will become two syrup bags.

Use your Food Saver machine to seal the the two open 11 inch. sides of your bag.

Use your craft cutter, to cut the strip in half (5.5 inches each).
Now you have two syrup bags. Repeat as many times as you need to get the number of syrup bags you need to make your desired number of packets.
Dry Packet Bags

Using your craft cutter, with your bags upright again (11 inches going vertically), cut strips that are 4 inches. Each of these strips will make 2 dry packet bags.
Use your Food Saver machine to seal the two open 11 in. sides of your bag.
Use your craft cutter to cut the strip in half (5.5 inches each). Now you have two dry packet bags!
Step Two: Filling the Dry Packet bags

Assemble the dry ingredients to whatever shake you’d like your kit to make.
Stand your dry packet bags up in your plastic container, open side up.
Use a clean piece of white paper and tape to make a funnel (sorry, I forgot to photo this part!) and empty one serving of each of your desired ingredients into each bag (so if you are adding dry milk, it’d be 1/4 c. per bag, protein powder would be 1 scoop per bag and so on.).
You may need to tap the bag down a bit to get the powder to go all the way down into it before sealing the remaining edge with your Food Saver Machine.

And there you have it – dry powder packets!
Step Three: Filling the Syrup Bags
Now personally I find this part a bit of a pain in the butt. You could just as easily go to the dollar store and get a clear plastic cosmetic bottle and fill it with syrup. BUT, if you are feeling crafty, here’s how I made the syrup bags.
Fill each syrup bag 3/4 of the way full with your desired syrup. If you have a mini-funnel that probably works well. I simply open the bag and pour straight in.
You’ll need a clip of some kind to keep the syrup from spilling when you seal the remaining edge. I find a jumbo (never been used!) bobby pin works great.

Seal the remaining edge using your Food Saver machine (mine has a gutter to catch any liquid that manages to escape but so long as you don’t overfill the bag, it should be fine).

Those who dealt with my first shake kit batch mishap might understand why I tend to double seal 🙂

Step Four: Putting it All Together
So if you do decide to do syrup packets (and there is merit in them…they look way impressive) you’ll want to affix the syrup packet to the dry packet to make it all easy to transport. To do this, use super strength glue dots (they are like $2 for a gamillion of them at the craft store). Finish it off with a cute label (if you are REALLY feeling crafty) or simply use a marker to label it.
…and there you have it. Shake kits! The idea for the BF Shake Kits came from me actually doing this for myself once weekly. I have a cooking day (where I cook my lunches for work for the week) and I’ll also make up shake kits (I usually make two weeks worth at a time so I am making an even number). It takes about 30 minutes to make two weeks worth and I have grab and go shakes!
So like I said, this is a good activity for a rainy or snowy day or as you prepare for your week ahead.I’m thinking a “shake packet” contest might be in our near future. I bet you guys have some great ideas. Stay tuned!


Very cool! I'm going to have to purchase a Food Saver Machine!
wow! so amazing. Thanks for your helpful tip!
Ok this idea is totally cool. I’m going to look into a Food saver now. The syrup.packets are the coolest because I love carrying my own Sugar Free Torani but the bottle can be cumbersome. Thanks a bunch 😉